
A few months ago I was given this DECAKER Micro Laser Engraver by GearBest to make a review and I have finally had some time to do it, so here it is. Starting with a few basic information, this engraver has a 1W laser head and the engraving area it's only about 38x38 mm, but enough for a laser engraving amateur like me, at least for now.


That said, it won't work on metal, ceramics, stone or reflective
materials, but it'll do just fine in wood, plastic, paper and leather.
The engraver comes mostly assembled and is almost ready to use, which is
certainly an advantage.
The package is relatively small (25.70 x 18.80 x 18.50 cm). It arrives like it's shown on the following image:


The package brings a few items, among those are the main structure itself, the laser head, some cables:

And the laser safety goggles:
 Regarding the cables, there are two of them, both USB, one for power and another one for communication with the control software. The laser head also brings two screws and a screwdriver to fix the laser in place:


Now for this, just turn your main structure upside down, and put the laser head in the right position, fix the screws in place and then just connect the cable. First thing I noticed here is that the motor and axis look to be similar to the system used inside CD/DVD drives, interesting. Be sure to properly fix everything down and tight, if anything is loose, it will result in bigger vibrations, more oscillation and less precision during the engraving process, which will lead to undesired results. We're working with a laser so precision is everything.

With that done, the assembly is complete and the engraver is ready to use. The engraving area comes with an engraved card which appears to be done as a quality test:

The package also brings a bag with a few materials for engraving: paper cards, two wood chips, and three pieces of leather:
 I decided to use a wood chip first and already adjusted it to be centered according with the image I want. I've also played a bit with the engraving time to test and compare different results. The default is about 60 ms but I noticed this is too much for the paper cards for example, if you get a wide area in black it can just burn a hole. So I'm using 30 ms now, it just seems adequate for most materials, but you might want to try different values. Now let's start engraving! Press "start" and that's it:
You can actually notice the difference the safety goggles do to the glare on the camera lens. After a while it was done. The laser head turns into low power mode and moves to the center:
 And here is a closer look to the final result, it took about 17 minutes:
 For some reason it cut a bit of the top of the image. I think it needed to be scaled down a bit. Still, the rest was pretty cool. I tried it again with a different image and using a paper card:
 This time there was not problem like that:
 Now let's move on to the "gray carve" mode. This basically converts an image to a gray scale picture and allows you to carve that onto objects by varying the carving time/power of the laser according to the level of black tone necessary:
 Import the image, and then the options are basically the same as before. Adjust the location of the material with the help of the "carving preview box". I'm using a paper card again. Then hit "start":
 It'll take a bit longer than before, about 30 minutes, which is actually a problem because on the manual it says the machine should run for periods longer than 25 minutes. Although it seems to have worked just fine. Next I decided to try the same "gray carve" mode but using leather instead, so I imported a new image:
 Then centered the leather in place and started the engraving process:
I noticed at the start that the lines were too dark so I decided to reduce the carving time to 24 ms. After a while, half of the image was done but I still thought it was too dark, so I kept reducing the carving time smoothly to 10 ms:
 And you here is the final result, the changes in the carving time are pretty noticeable. The line at the top was a weird bug, I started the carving process and
the laser head did its job, but the bed never really moved, so it kept
carving in the same line, over and over again. I had to unplug
everything and try again.
And you here is the final result, the changes in the carving time are pretty noticeable. The line at the top was a weird bug, I started the carving process and
the laser head did its job, but the bed never really moved, so it kept
carving in the same line, over and over again. I had to unplug
everything and try again.
 I noticed there was a lot of dirty in the left side, you can even see the place where the tape was. I suppose it was little particles of ashes and dust being pushed to that side because of the fan. So I thought it would be cool to experiment what would happen if I washed the leather to clean all the dirt. This is how it gets:
 Not bad at all. Although two lines appeared on top of Hannibal's head, this is because the leather got loose during the engraving and I had to refix it to the bed, I supposed the laser head passed twice on places it had already been while I was touching the leather. Next let's see the "offline carve" mode. As the name indicates this mode allows the machine to work without the software, at least for the carving process. Select that offline mode tab and import an image, them click on "send image to supercarver" and wait for the message box on the left to say its complete:
 Next you must unplug the laser engraver and you can now quit the software. From now on, you can always engrave that image with those settings, right from the engravers memory. For this you'll need to plug both USB cables (yes both, it doesn't work just with the power cable, I suppose it needs more power from both ports). I only tested on the computer, but I suppose it also works with USB power supplies, like phone chargers. Now, since there is no "carving preview box" button, you can use the arrow buttons on the machine to understand where the engraving area is. Or you can use the center button, for it does exactly the same as the "carving preview box". If you press it a second time, it will start the engraving process:
By the way, the red button is the power button, if you hold it down for a few seconds it will put the machine in a standby mode. Pressing it again will turn it back on, this happens regardless of which mode you're using. Finally let's talk about a particular funny tool which I quite like, the "focus" tool, referenced in the manual as "Online Positioning Picture Carving":
 This turns the laser head into a mouse controlled laser, you can move the cursor onto the canvas and if you press the mouse left button it'll simultaneously draw it on the software canvas and on the material in the machine. It's basically a manual laser carving mode:
For this to work nicely, you just have to draw things slowly, otherwise the laser head will move too fast and it won't have enough time to engrave things well. In this mode you also have three cursor size options, although I'm not quite sure what they're for, since the laser pointer always have the same size, the only difference it makes is on the software canvas. Here I was just fooling around:
 Using this tool made me think of something useful, using this method to manually correct the small cut defect on top of the first engraved image I did. And after a few minutes it was fixed:
 It's not perfect, but it'll do, after all it was handmade and I'm not exactly an artist. Now moving on to the negative parts. First, I had a few issues while testing the engraving machine. Most annoying of all was losing steps (I think) on the laser head axis, but it's easier to show an image than to explain so here it is:
 As you can see, immediately before the half on the image, everything lost the alignment. I think it was the step motor loosing some steps. But why did this happen? I've used the engraver over 20 times and this only happened on the last 3 times. Yes this happened 3 times, always on the "binary carve" mode (not sure it was just a coincidence). It happened again here on leather, so I unplugged the machine, waited a few minutes and tried again to be able to get a finished engraving:
 But what I think happened is that the motors overheated because of the prolonged use of the machine. After all it says in the manual to not use the machine for periods longer than 25 minutes, and during this review I've been using it for hours. Sure it was not always engraving, but it was turned on, and it did a lot of short individual engraving tests. So that's what I think happened. It makes sense. I tried opening the machine, to get to the control board, hoping to see if the motor drivers were adjustable, but the bed is glued down. On a separate occasion something else happened, when I started the engraving process, the laser head movement was working fine, the software indicated the progress was being done but the bed didn't really move:
 It kept going over and over again on top of the same line. The result is that small defect on top of the Hannibal engraved picture I've showed before. I had to unplug everything, wait for a while and try again to obtain a finished work. This time I'm not really inclined to any probable cause, however it might be the same overheating problem but this time affecting the bed, but it's weird that instead of loosing steps, it just didn't move at all. Or maybe it was just a bug. Anyway, it only happened once. Those are the only issues that I've found. Now my final evaluation.
Strong points:
Weak points:
And this is my honest review. It's quite a useful machine, and even though it is small and low power, it still can make some pretty interesting works of a variety of materials. Sure it has an issue or two, but overall it has a good quality/price relation.
If you want to check it out for yourself, you can get one here.
Just don't forget to put on the safety goggles and use it on a well ventilated space.

Now to get started, plug in the power input DC jack and the micro USB connector on the laser engraver. Here I noticed that the connectors were not perfectly aligned to the holes in the structure, so it was a bit hard to plug in the USB port. I pressed the power button on the front, to push the PCB inside forward, centering the connectors, making it easier to plug them in:

That done, you can plug the other end of the cables to your computer. Put on the safety goggles to protect your eyes from the laser radiation. The laser will turn on in low power and the engraver will start homing the axis and pause in the middle of the area. It doesn't have axis endstop sensors, so if the laser head and bed are in random locations, they will hit the end of the path and make a little noise but then it'll stop. It surprised me the first time I turned it on. Now here it might be a problem if you're a Linux or an iOS user, because the software is only available for Windows. Next, plug int the software USB drive that comes with the engraver, and run the control software inside. It probably won't recognized the device so just let it install the drivers:
 After the installation it might be needed to unplug all the cables, close the software, plug the cables again and restart the software. After that, it should be ready to use. Now that the laser is plugged in and the laser turned on in low power mode, it is a good time to adjust the laser focus. This is important to get clear engravings, otherwise they will appear foggy. To do that just put on a card on the bed, and turn the laser lens until you get the smallest light dot you can get:
 It actually helps to have the googles on to do this, because it filters all the purple glow and allows you to see the dot better. Now just don't forget that the lase focus should be adjusted everytime you use objects with different heights. The engraver brings two rubber bands to fix the objects to the bed, however I broke mine after a while, so now I just use duct tape. Once the laser focus is adjusted and the software connected to the laser engraver we can actually start working. Here you have a few options, like "binary carve", "gray carve" and "offline carve" but I'll talk about them a bit ahead. First if you go to "Setting > Config" you can adjust the motor speed and X/Y axis reverts:
 I think it comes with the default motor speed of 70, however after a few tests I decided to reduce it to 65 since I was getting foggy results, it will be a bit more noisy but it produces better engravings. I didn't touch the axis options. The "About" menu actually has a little guide with a few examples with different materials and carving times. Now, let's start with the "binary carve". This mode is to engrave things in "black and white", hence the name binary, so make sure you choose an appropriate image for this. Go to "File > Open" and select the image you want. The USB drive with the software also has a few image examples you can use, as well as the pdf version of the user manual.
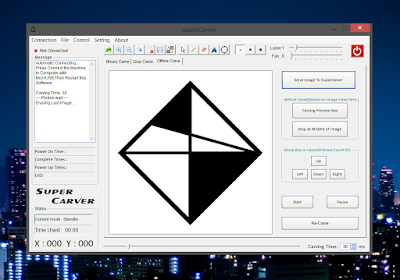
 The image will appear in the canvas and now you can make all the adjustments you want. You can draw onto the picture or or even add text, although I've noticed that the text tool usually ends up a bit crappy during the engraving process, so I've concluded it's better to add the text in a drawing program even if it is "MS Paint", and then just import the image already with the text you want. Now to prepare the engraving there is a toolbar on the right. To understand where the image will be engraved on the object, press the "carving preview box" and the laser head will indicate the edges of the image you want to carve. Then press "stop at the middle of the image" and adjust the object if necessary:


Strong points:
- Very practical because of it's overall small size;
- Relatively cheap;
- Relatively good quality engraving, so good quality/price relation;
- The structure itself is quite robust;
- Almost ready to use, so quick setup time;
- Also very easy and intuitive to use;
- Software has different useful engraving modes.
Weak points:
- Small engraving area;
- Low power laser, so limited materials can be carved;
- A bit noisy although it depends a lot on the motor speed;
- Max engraving time of 25 min is very short, even though it is not limited;
- Software for Windows only;
- Material bed fixation feels low tech with the rubber bands and will break eventually;
- Laser head and bed structure are a bit fragile and vibrate.
And this is my honest review. It's quite a useful machine, and even though it is small and low power, it still can make some pretty interesting works of a variety of materials. Sure it has an issue or two, but overall it has a good quality/price relation.
If you want to check it out for yourself, you can get one here.
Just don't forget to put on the safety goggles and use it on a well ventilated space.
Oh, I can see some interesting xmas gifts done with this! Great post!
ReplyDeleteThank you Nelson! It sure is a great idea!
DeleteHi Joao,
ReplyDeleteI bought the same DECAKER SUKA from gearbest.com but my pack did not have any USB or DISC with the software. Would you able to upload it somewhere because the support is not answering me and could not find it yet! :(
Thank you!!
Hi sir can u send me pc softwear to my email Sudhir5@rediffmail.com or link I got this Item but softwear thay not given can u please send me
ReplyDeletewhere can I download the software? i lost the USB
ReplyDelete